styled-compoenents 없이 스타일을 선언하는방법
1. style.css파일을 만들고 글로벌로 선언한다.
// index.js
import "./style.css"
2. 인라인 스타일 사용
// app.js
function App() {
  return <div style={{backgroundColor: red}}>안녕하세요.</div>
}
3. css 모듈사용하기
// Movie.module.css
.movie {
 background-color: red;
}

// app.js
import styles from './Movie.module.css' //파일명 module.css

function App() {
  return <div className={styles.movie}>안녕하세요.</div>
}
css 모듈을 사용하면 클래스명을 해시로 만들어줘서 충돌날일이 없다.
설치
npm i styled-components기본문법
import styled from 'styled-components';

const Father = styled.div`
  display: flex;
`;

const BoxOne = styled.div`
  background-color: teal;
  width: 100px;
  height: 100px;
`;

const App = () => {
  return (
    <Father>
      <BoxOne></BoxOne>
    </Father>
  )
}

export default App;
장점 - styled components가 class명을 만들어주고 있다.

props 스타일 적용
공통된 코드를 사용하면서 한부분만 달라지는경우
달라지는 부분만 props로 받아서 선언하면 된다.
props로 내려주는 이름(ex bgColor..)은 정하면 된다.
import styled from 'styled-components';

const Father = styled.div`
  display: flex;
`;

const Box = styled.div`
  background-color: ${(props) => props.bgColor};
  width: 100px;
  height: 100px;
`;

const App = () => {
  return (
    <Father>
      <Box bgColor="teal"></Box>
      <Box bgColor="tomato"></Box>
    </Father>
  )
}

export default App;
스타일 extends
Box 스타일을 상속받고 원하는 속성을 추가해 새로운 스타일 컴포넌트(Circle)를 만들고 싶을 때
import styled from 'styled-components';

const Father = styled.div`
  display: flex;
`;

const Box = styled.div`
  background-color: ${(props) => props.bgColor};
  width: 100px;
  height: 100px;
`;

const Circle = styled(Box)`
  border-radius: 50px;
`;

const App = () => {
  return (
    <Father>
      <Box bgColor="teal"></Box>
      <Circle bgColor="tomato"></Circle>
    </Father>
  )
}

export default App;
as
기존 스타일 컴포넌트를 태그만 변경해서 확장하고 싶은경우 as props 내려주면 된다.
import styled from 'styled-components';

const Btn = styled.button`
  background: tomato;
  border-radius: 50px;
  color: #fff;
  font-size: 14px;
  border: 0;
`;

const App = () => {
  return (
    <div>
      <Btn>버튼</Btn>
      <Btn as="a" href="https://www.naver.com">버튼</Btn>
    </div>
  )
}

export default App;
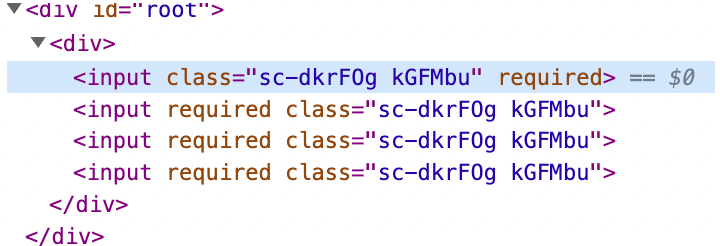
attrs
attrs을 사용하면 속성을 오브젝트로 담아서 내려줄수있다.
import styled from 'styled-components';

const Input = styled.input.attrs({required: true})`
  background: tomato;
`;

const App = () => {
  return (
    <div>
      <Input/>
      <Input/>
      <Input/>
      <Input/>
    </div>
  )
}

export default App;

animation
styled-components에 내장되어있는 keyframes를 사용해서 animation을 구현할 수 있다.
const rotateAnimation = keyframes`
  0% {
    transform: rotate(0deg);
    border-radius: 0;
  }
  50% {
    border-radius: 50%;
  }
  100% {
    transform: rotate(360deg);
    border-radius: 0;
  }
`;

const Box = styled.div`
  width: 100px;
  height: 100px;
  background: tomato;
  animation: ${rotateAnimation} 1s linear infinite;
`;
자식 태그 selector, 가상선택자
자식 요소가 styled compoennts로 선언되지 않아도
태그 selector, className으로도 선택 가능하다.
sass 문법처럼 &:hover 호버처리 스타일도 선언할 수 있다.
const Box = styled.div`
  width: 100px;
  height: 100px;
  background: tomato;

  span {
    color: #fff;
    &:hover {
      color: blue;
    }
  }
`;

const App = () => {
  return (
    <div>
      <Box>
        <span className='test'>박스</span>
      </Box>
    </div>
  )
}
자식 컴포넌트 selector
const Text = styled.span`
  color: blue;
`;

const Box = styled.div`
  width: 100px;
  height: 100px;
  background: tomato;

  ${Text}:hover {
    color: red;
  }
`;

const App = () => {
  return (
    <div>
      <Box>
        <Text as="p">박스</Text>
      </Box>
    </div>
  )
}
themes
기본적으로 모든색상들을 가지고 있는 object다.
페이지에 필요한 공통 색상을 하나의 object에 넣어놨기 때문에
나중에 theme를 변경할때 object만 변경해 주면 된다.
ThemeProvider로 최상단 컴포넌트를 감싸주고 theme를 props로 내려준다.
import App from './App';
import React from 'react';
import ReactDOM from 'react-dom/client';
import { ThemeProvider } from 'styled-components';

const lightTheme = {
  bgColor: '#fff',
  textColor: '#000'
}
const darkTheme = {
  bgColor: '#000',
  textColor: '#fff'
}

const root = ReactDOM.createRoot(document.getElementById('root'));
root.render(
  <React.StrictMode>
    <ThemeProvider theme={lightTheme}>
      <App />
    </ThemeProvider>
  </React.StrictMode>
);
최상단에서 props로 theme를 내려줘서
자식 컴포넌트에서 props.theme로 받아서 사용하면 된다.
import styled from 'styled-components';

const Father = styled.div`
  background-color: ${props => props.theme.bgColor}
`;

const Box = styled.div`
  color: ${props => props.theme.textColor}
`;

const App = () => {
  return (
    <Father>
      <Box>
        박스입니다.
      </Box>
    </Father>
  )
}

export default App;
'React' 카테고리의 다른 글
| 기존 CRA프로젝트에 typescript 템플릿 추가하기 (0) | 2023.02.22 |
|---|---|
| styled-components로 theme적용하기 with Typescript (0) | 2023.02.22 |
| styled-components, emotion 비교 (0) | 2023.02.22 |
| redux-toolkit (0) | 2023.02.20 |
| redux개념 정리 (0) | 2023.02.16 |