인풋을 제어하려면 인풋마다 setState, onChange 값이 각각 필요한데 이런 번거로운 작업들을 해결해주는 라이브러리!
간단한 코드로 인풋에 에러, validate, 이벤트 제어할 수 있다.
설치
npm install react-hook-form
register
인풋 name, onchange, onblur 함수를 가지고 있는 객체
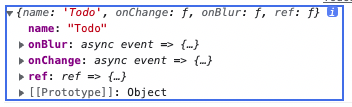
사용 시 spread 문법을 이용해 register객체에 있는 값을 넘겨준다.
import React, { useState } from "react";

import { useForm } from "react-hook-form";

const TodoList = () => {
  const { register } = useForm();
  return (
    <form>
      <input type="text" {...register("todo")} placeholder="입력해주세요" />
      <button>add</button>
    </form>
  );
};

export default TodoList;
watch
form 내부의 인풋 입력값들의 변화를 관찰할수있게 하는 함수

handleSubmit
form 요소에 onSubmit값으로 들어간다, 두가지 인자를 받는데
하나는 유효했을때 실행할 함수(필수), 두번째 인자는 유효하지 않았을때 실행할 함수(필수아님)
유효했을 때 실행할 함수는 인자로 data를 받는다
import { useForm } from "react-hook-form";

interface ITodo {
  todo: string;
}

const TodoList = () => {
  const {
    handleSubmit,
    setValue,
  } = useForm<ITodo>();

  const onValid = (data: ITodo) => {
    console.log(data);
    setValue("todo", "");
  };

  return (
    <form onSubmit={handleSubmit(onValid)}>
      ...
    </form>
  );
};

export default TodoList;
setValue
예를 들어 submit을 하고 인풋창에 값을 비워야하는경우 value를 제어할 수 있는 setValue
const {setValue} = useForm();

setValue('todo', '')
default value
useForm을 사용할때 우리 데이터가 어떤 type인지 명시를 해줘야한다. (interface 사용)
useForm에 defaultValues 선언할 수있다.
interface IForm {
  email: string;
  password: string;
  password2: string;
  address?: string;
  nickname?: string;
}

const TodoList = () => {
  const {
    register,
    watch,
    handleSubmit,
    formState: { errors },
  } = useForm<IForm>({
    defaultValues: {
      email: "babo@naver.com",
    },
  });
}
validate
require (필수입력요소)
필수입력요소 검증하는 방식은 첫번째는 html 검증, 두번째는 자바스크립트 검증
1. html 검증
아래 처럼 html태그에 required 속성을 넣어주면 html validation을 해준다.
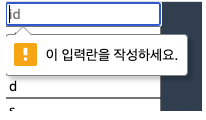
<input type="text" required />개발자도구로 required 속성을 없애거나, 검증을 지원하지 않는 브라우저에서는 검증을 못하는 경우가 생길 수있다.
2. 자바스크립트 검증
<input type="text" {...register("email", { required: true })} />
<input type="text" {...register("email", { required: "이메일은 필수값 입니다." })} />
// register에 required 넣어주면 input에 반영이 된다.
required 속성은 boolean값, string값으로 써줄 수있다.
오류가 나면 해당 인풋에 포커스를 해준다.
minLength(최소 길이)
<input type="text" {...register("email", { required: true, minLength: 10 })} />

<input type="text" {...register("email", {
	required: true,
    minLength: {
    	value: 10,
        message: "10글자 이상으로 입력해주세요."
    }
    })}
/>
pattern (정규표현식)
정규표현식 테스트 사이트 - https://regex101.com/
정규식 패턴을 validate하고 message 지정도 할 수 있다.
<input
      type="text"
      {...register("email", {
        required: "email 입력해주세요",
        pattern: {
          value: /^[A-Xa-z0-9._%+-]+@naver.com$/,
          message: "제대로된 이메일을 입력하세요",
        },
      })}
      placeholder="email"
    />
formState.errors
에러나는 요소를 보여주는 객체. type, message를 보여준다.

에러 표시하기
const TodoList = () => {
  const {
    formState: { errors },
  } = useForm();

  return (
    <form>
      <div>
        <input
          type="text"
          {...register("email", {
            required: "email 입력해주세요",
            pattern: {
              value: /^[A-Xa-z0-9._%+-]+@naver.com$/,
              message: "제대로된 이메일을 입력하세요",
            },
          })}
          placeholder="email"
        />
        <span>{errors?.email?.message}</span>
      </div>
    </form>
  );
};

export default TodoList;
setError
onSubmit 했을 때 다른 검증조건에 의해 에러처리를 할 경우
setError를 이용해서 오류를 발생시킬 수 있다.
should focus는 오류가 발생되면 해당인풋으로 포커스 해주는 옵션
const onValid = (data: IForm) => {
	// password, password2값이 같지 않는경우 password2 인풋 오류메세지가 노출
    if (data.password !== data.password2) {
      setError("password2", { message: "password are not same" }, { shouldFocus: true });
    }
};
form 오류 처리
각각 인풋요소가 아닌 전체를 감싸는 form에 오류처리를 하는경우
1. 오류메세지를 받을 타입추가
interface IForm {
  email: string;
  password: string;
  password2: string;
  address?: string;
  nickname?: string;
  extraFormError?: string;
}
2. 에러케이스 추가
const onValid = (data: IForm) => {
    if (data.password !== data.password2) {
      setError("extraFormError", { message: "server offline" });
    }
};
3. 에러메세지 출력
<span>{errors?.extraFormError?.message}</span>
Custom validation
직접 조건을 만들어서 validate할 수있다.
validate는 함수를 받고 boolean, string값을 리턴한다.
validate: (value) => value.includes("nico") ? false: true
여러개 조건이 들어갈 수있다.
validate: {
  noNico: (value) => value.includes('nico') ? 'no nico allowed' : true,
  noNick: (value) => value.includes('nick') ? 'no nick allowed' : true,
}
valiate에 들어가는 함수를 async 비동기로 만들어서
서버에 확인하고 응답받을 수 있다.
validate: {
  noNico: async(value) =>
}
'TECH' 카테고리의 다른 글
| react-router-dom v6 (0) | 2023.03.02 |
|---|---|
| Recoil 개념 (0) | 2023.03.02 |
| styled-components 전역 스타일링 (Global style) (0) | 2023.02.24 |
| styled-components로 theme적용하기 with Typescript (0) | 2023.02.22 |
| styled-components 기본 문법 (0) | 2023.02.22 |